Instructions
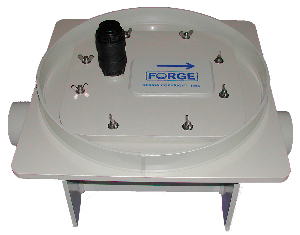
On receipt of your valve please check that it has not been damaged in transit. The flap/spindle assembly should swing freely from the pivot points and this may be checked by touch through the outlet pipe. Attach the air release valve by screwing onto the thread on the lid. The lid is marked with an arrow which should align with the normal flow through the pipe.
It is best to install the valve in a purpose built inspection chamber so that access can be made to it to remove the lid, wash down and inspect. A minimum of 600 mm by 750 mm sized chamber of precast concrete sections or engineering brickwork would allow enough space around a 100 mm or 150 mm dia valve. Larger valves are best suited in concrete rings.
For rectangular manhole sections have a look here: http://www.miltonpipes.co.uk/products/inspection.asp
For Concrete Rings look here: http://www.miltonpipes.co.uk/products/manhole.asp
The Domestic type valve does not need to be housed in a purpose built chamber. If the depth from ground to invert level is less than 1.0m it will be accessible by fitting UPVC raising sections (available from your builders merchant) of standard 500 mm diameter. These clip to the valve casing and can be surrounded with granular material or lean concrete.
You will need Flexseal, Hepworth flexible coupling or equivalent couplings and possibly bushes to attach the valve to the sewer pipe. As you tighten the coupling it is important that you check that invert of valve and pipe are correctly aligned. For more detailed information visit www.flexseal.co.uk or you can try www.hepworthdrainage.co.uk but it is difficult to navigate.
We recommend that the valve is checked at least twice a year. All that is needed is a quick clean with a high pressure hose.
Spare Parts
Spare parts are available should they be needed but they do need to be fitted by a competent person who has read these instructions.
The existing float/flap assembly can be removed in one unit by lifting out of the pivot cradles. Remove the neoprene rubber from the spigot end of the incoming pipe only if it is damaged by loosening the screw on the retaining band. “Don’t fix wot ain’t broke”, its easier to leave the flap sealing rubber in place if it is undamaged than change it in a cramped manhole. The seal is designed for the life of the valve.
The new pivot rod may need to be cut shorter to prevent it binding against the side walls of the valve. Each valve is hand made so we leave the pivot rod long to accommodate any small differences between valves. Use the old flap assembly as a template, when inserted the flap must seat directly over the rubber seal NOT to one side. This may mean removing a little from each end of the pivot rod. check it will turn freely in the cradles.
If you are replacing the rubber seal, clean pipe end and fit new rubber seal and retaining band but do not fully tighten or push fully onto pipe. Now replace flap assembly and gently close flap pushing rubber seal into place and ensuring a continuous seal between flap and rubber seal. Now tighten retaining band.
All that’s left is to secure the float onto the spindle using the two screws provided. Hold the flap closed with one hand and centralise the float with the other. Position it slightly below the top of the side walls to avoid it clashing with the lid. Mark this position and fix.
The self locking bolt attaching the flap should be left loose enough to allow some movement.

